
RFX (request for anything) - is the most common type of request designed to simplify the process of ordering raw materials, which allows to compare more than 1000 bids and make data-driven decisions.
Creation process consists of four steps.
Step 1. General Information tab
Start with putting a name of your request, which can contain request type, company name, year and any other information you consider necessary.
Fill in Description section with your expectation, formalities or any other important information your suppliers should be aware of before proceeding to submitting their offers.
You can change any settings even while your RFQ is running and inform your suppliers about it with the help of advanced setting `Notify supplier about changes in request` which you can find below in this article.

Setting Start date and Final date is crucial, otherwise the system won`t let you continue with further steps. With the help of these you can determine when suppliers get access to giving quotes and when this opportunity ends.
You can also click `Change timezone`, which will direct you to your Personal Profile, where you can choose the timezone you need.

In case you change Final date after RFX is finished, you can select the option to notify the suppliers about this change. 
There is an opportunity to insert Payment Terms and Incoterms on a general basis, which will be applied for all items in the request, although in case you need to determine these terms per item individually, you can do it later on Items tab.

There are also two other functions: Contact person/Grant Access and Currency.

Contact person/Grant Access
After you click Contact person/Grant Access, a new modal window will open, where you can do the following:
-
search other users of your company;
-
manage different levels of access for users of your company;
-
add new users to the company.

After all changes are made within this window, click button Save and close to keep all the changes.
Within section Currency it is possible to define anchor currency and select additional currencies to let your suppliers give their quotes using their currencies. There is an option to edit currency if needed. Click the pencil on the right from the currency you selected and insert the digits you need.


In section Attachments there is an opportunity for you to attach different types of files:
- terms for confirmation (suppliers won`t be able to see the list of items and submit their offers unless they accept the terms)
- documents for digital signature (suppliers won`t be able to see the list of items and submit their offers unless they sign the documents)
- additional files for suppliers to be available for reading
Click button Attach file and select files from your computer.

Go to section Advanced settings in order to make your request more tailored to your needs.

Test Request. The request won't be available for suppliers and won`t be included into statistics.
Notify supplier about changes in request. Suppliers will get email notification in case product information is changed.
Activate QA. When activated, listed suppliers can ask questions per item. Pay attention that your replies will be visible to all other listed suppliers after your reply.
Supplier has to confirm that he participates. If you turn this on, it means that suppliers will have to confirm their participation before they can see the list of items. They can also decline their participation. In this case they will not have access to the request.
Send invitation when RFX is published. Suppliers will get email notifications as soon as your request is published. This will enable them to view the request, though they will not have an opportunity to give quotes before the start.
Send reminder to supplier about missing quotes. While activated, the system will send notifications about the chance to submit quotes at the specific time you select

Upload of SDS is mandatory. If you turn this on, suppliers will have to upload SDS in order to be able to submit their quotes.
Include RFI/Questionnaire. You can prepare a list of questions for potential suppliers to answer. With the help of the additional settings you can do the following:
- Purchaser Gatekeeping before RFP - suppliers will be able to give their quotes only if you approve their answers. Approval can be made on RFI tab.
- Give ability for suppliers to edit RFI answers - let suppliers change their answers before you check them.
Set Final date until which suppliers will be able to answer the questions. Suppliers won`t have access to the request if they don`t insert their replies within the time frames you set.

Alternative bid. Let suppliers make several offers per item, which will allow you to select the most suitable option among the others. This function is frequently used when buyers look for alternatives.
Ability to make offers via email using AI. Allow suppliers to send their offers via email without logging in the platform.
Show Qualification (based on Excel) to supplier. By activating this function, you can share `incumbent` status of uploaded items for suppliers. This status will be visible to suppliers within the request.
Traffic light feedback. Turn on this function if you want suppliers` offers to be marked with different colors according to the way you set them. Read more about how you can arrange Traffic light feedback here.

Activate auctioning. This option is suitable for quick requests of 15-30 min duration, usually for a few items. You can read more about how to create and manage an auction within a request in this article.

Remember to save all the changes with the help of button Save and next step.
Step 2. Add Items
When it comes to adding items to request, there are two ways to do that: manually on the platform and via Excel.
Adding items manually on the platform is suitable in case you don`t plan a big request, just for a few items.
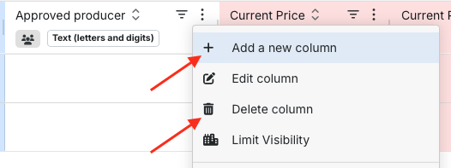
Step 1. Check if all columns are present.
If some default columns are not needed, they have to be deleted. Users can add new columns if they are missing. In order to manage columns, click Three Dots button in the top right corner next to Column name and choose options Add a new column or Delete column.
Step 2. Insert data such as Item name, Quantity, Unit etc in empty spaces. After all needed spaces are filled, go back to Item name column and click orange button Save item. Add other items by clicking ![]()
Step 3. If you want to edit the inserted data, double click on it, change data and click Enter or any empty space on the page.
Step 4. After all information is added, click Save and Next step button in the bottom left corner of the page before you go to the next step.
Additionally, you can select and delete multiple items at once.

While setting up a tender, Buyers can require monetary value (with currency), percentage or just a numeric value from suppliers.
-
For monetary value: select system column `Supplier Price per Unit/UOM` or create a new column with type `Fillable for suppliers (required)`, format `Price (value for analytics)` and give it a name. Please make sure you selected anchor and allowed currencies on General tab.

-
For percentage: create a new column with type `Fillable for suppliers (required)`, format `Percentage` and give it a name.

-
For numeric value: create a new column with type `Fillable for suppliers (required)`, format `Number > 0 (only digits with decimals)` and give it a name.

If you plan to create a bulk request, it is recommended to consider adding items via Excel.
It is advised to use an Excel draft, which is designed to store all necessary information.
You should download the draft, fill it in with information and upload it back to the platform.

After uploading the file, the system will ask you to select the format of columns. After everything is ready, click button Upload.
Before going to the next step, make sure the list of items is correct. Click button Save and next step.
You can read more about how to work with Items tab here Article `How to Work with Items Tab`
Please note that it is impossible to delete all items at once, at least one item should be in the list.
Step 3. Add Suppliers
There are several ways to invite suppliers to your request.
The first one is to select suppliers from the list. You need to click checkbox on the left from supplier company name in order to add supplier to the list of the invited ones.
You can also mark suppliers as your favourite ones clicking the star.

There are three buttons under suppliers` names, which perform the following functions:
![]() invite further users to supplier`s company;
invite further users to supplier`s company;
![]() go to company profile, which will direct you to detailed information about the company;
go to company profile, which will direct you to detailed information about the company;
![]() show list of all users of the company.
show list of all users of the company.

You can apply filters to make the search process faster and more effective.

There is an additional option to apply labels. You can create a new label and use it for certain suppliers to make further search processes easier.


The second option is via Excel. Click button Draft to download an Excel file. After downloading, open the file and specify company names, user names and user emails. Check if everything is correct and upload the file back to the system.

After successful upload of the file, you`ll see the amount of suppliers with different statuses: active, with open invitations, those who haven't finished registration yet, those who confirmed and declined participation.
Button Actions lets you manage the suppliers in the following ways:
- send message to all suppliers;
- mark suppliers as your favourite ones;
- remove suppliers from your favourites;
- Export list of suppliers via Excel

There are additional functions to Invite further suppliers and Run automated supplier listing.
![]()
Within option Invite further supplier you can invite any suppliers (in case they aren't using PINPOOLS yet) for them to be able to give quotes for your request. After clicking the button to invite suppliers, you will see a modal window with the fields to be filled out by you in order to create an invitation.

After completing all the fields, click button Invite. The suppliers you invited will receive an email with the link, which will lead them to complete a simple form and be able to submit their quotes for your offer.
FAQs about Suppliers tab
1. What do I do if I want to edit or delete suppliers account?
If you need to change or delete existing supplier`s email address, you should contact Customer Support service, asking for Human Agent.
2. I can`t find a supplier in Search bar and when I try to invite them, the system tells me `The email address has been taken`.
In this case please contact Customer Support service and ask for Human Agent help.
3. How can I add a new contact to supplier company?
On Suppliers tab, you should find needed supplier company and find a button `Invite further user` ![]() below company name.
below company name.
When a modal window opens, you should enter all needed data, such as user`s Full Name, Email address, Timezone and Language. Click `Invite` after all information is filled in and a new contact will be added to supplier company.
4. Can I invite all suppliers registered on PINPOOLS to my RFQ?
There is no such an opportunity to invite all existing PINPOOLS suppliers with one click, and moreover, it is not recommended to follow such a supplier management strategy.
5. Is it possible to uninvite suppliers at once (including after filtering them)?
Yes, users can deselect all suppliers on Suppliers tab or in modal window, which opens on Items tab after clicking button `Manage for that item` within Suppliers column.

Run automated supplier listing. While being activated, this one shows you the list of suppliers chosen automatically based on item names and CAS numbers you added. All suppliers in the list are the ones who have already given quotes for the items your RFQ contains.
After you have the list of suppliers ready, you should click button Save and next step.
Please note that you can also manage suppliers` access not for all items, but for each item individually, so it is possible to decide on items visibility for invited suppliers.
Read more about how to limit suppliers` access to needed items here.
Step 4. Preview
On this step the system lets you check and edit the general information about the request, such as Name, Description, users with granted access, Status, Start and Final date, Currency and Labels. You can create labels and attach them to your further requests for easier navigation.

There is also an option to check Items tab and Suppliers tab to make sure that everything is done correctly.

At the end, there is an option to Save as draft for further editing without being published yet or you can Publish the request and make it available for suppliers.