
Adding new items
Step 1. Check if all columns are present.
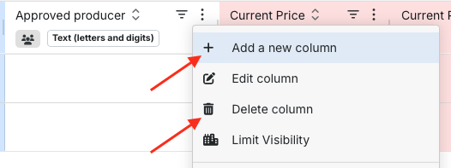
If some default columns are not needed, they have to be deleted. Users can add new columns if they are missing. In order to manage columns, click Three Dots button in the top right corner next to Column name and choose options Add a new column or Delete column.
Step 2. Insert data such as Item name, Quantity, Unit etc in empty spaces. After all needed spaces are filled, go back to Item name column and click orange button Save item. Add other items by clicking ![]()
Step 3. If you want to edit the inserted data, double click on it, change data and click Enter or any empty space on the page.
Step 4. After all information is added, click Save and Next step button in the bottom left corner of the page before you go to the next step.
Managing columns
Under each column name you will see an icon and text which define column types:
![]() - public, visible for suppliers;
- public, visible for suppliers;
![]() - private, suppliers can`t see it;
- private, suppliers can`t see it;
![]() - fillable for suppliers, so they can decide whether to fill it in or not. If they decide not to insert any data in it, they will be able to proceed with submitting their quotes;
- fillable for suppliers, so they can decide whether to fill it in or not. If they decide not to insert any data in it, they will be able to proceed with submitting their quotes;
![]() - required for supplier; suppliers must fill it in, otherwise they will not be allowed to submit their offers;
- required for supplier; suppliers must fill it in, otherwise they will not be allowed to submit their offers;
Buttons
![]() button – click to change order of items: A-Z order, Z-A order, your custom order;
button – click to change order of items: A-Z order, Z-A order, your custom order;
![]() button – click it to filter items in order to find particular ones;
button – click it to filter items in order to find particular ones;
![]() button – click to add, edit or delete columns, sort, pin, autosize them. You can also group columns, choose certain columns to be shown or hidden, reset columns and manage their visibility;
button – click to add, edit or delete columns, sort, pin, autosize them. You can also group columns, choose certain columns to be shown or hidden, reset columns and manage their visibility;
You can also click the column name, hold and drag it to left or right to change its order in the table.
Manage column size by holding and dragging its borders.

Please note, that if Item list is empty and it shows `No matches found`, it means that one or several columns have applied filters. In order to see Item list, check which columns have activated filters and click button Reset.

Managing items

On the left from Item name, you can find the following buttons: ![]() click it, hold and drag to move items
click it, hold and drag to move items
![]() click it to delete items
click it to delete items
Additional functions
On the right side of Item tab page, you will find two other buttons Columns and Filters.
Use Columns to do the following:
- hide/unhide columns by clicking ![]() checkmark;
checkmark;
- change columns order by holding and moving ![]() button;
button;

Use Filters to order the system to show you only those items that match the criteria you put in Filters section. Filters work based on the existing columns in the table.

Adding lots
In order to create a new lot click Add new Lot.

After a new window appears, give a name to the newly created lot and save it.

Create a new column, choose type Lot and Save it.

Double click the items that have to be added to the Lot and choose the needed lot.

Hold Lot column and drag it to section Drag here to set new rows in order to arrange sets of lines.

Items arranged in Lots will be visible for suppliers when they open item list and for buyers while analysing request results in section Supplier Analysis.
Updated Item tab has a super customizable view and new opportunities. It has become faster, highly adjustable and more functional to assure positive experience of PINPOOLS users on the platform.